You’ve probably never heard of Kingsoft Office. That’s a shame because it’s one of the best office suites on the market. Though it doesn’t contain all the tools offered by either Microsoft Office or LibreOffice (it offers only a word processor, spreadsheet, and presentation tools), it’s far more cost effective than the Microsoft offering and more stable than the LibreOffice alternative.
Don’t believe me? Until you actually try out the tool, the best way I can convince you is to give you 10 solid reasons why Kingsoft Office is superior to the competition.
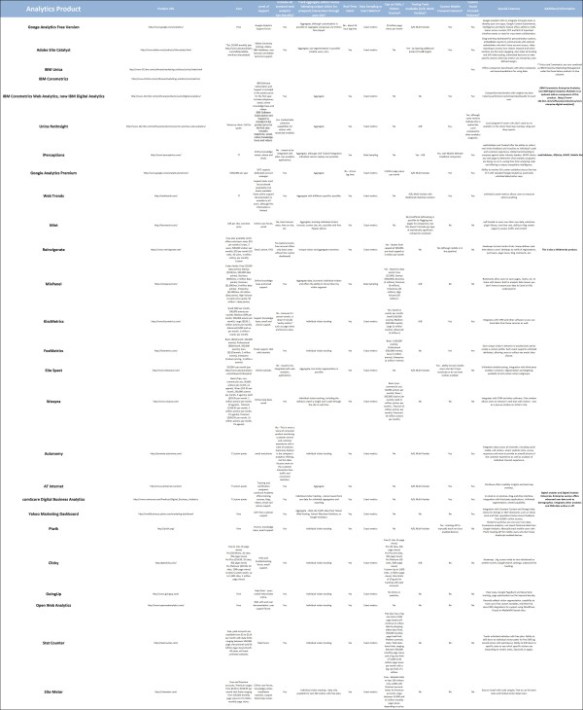
Kingsoft Office has free and paid versions. Another potential tool to consider for libraries searching for low cost/free productivity software alternatives.
I was asked whether I knew of any good timeline maker tools and I actually have never used one before. I did some investigating into what is available and am passing along the tools I found.
Tiki-Toki – Looks impressive but basic/free account has restrictions.
Dipity – More basic than Tiki-Toki but may not work well for print purposes. Looks great for web purposes and sharing.
TimeRime – Create, view, share and compare timelines. Basic account probably has some restrictions.
TimeGlider – This one looks more advanced and again may not work well for print purposes. Application moving away from Flash and will use a Javascript plugin. Complicated installation.
Timeline – This one is cross platform, free and open source. Requires installation. May be the best to use for print purposes. Mac OSX users may have to install from the command line.
Another option is to install a PowerPoint plugin from Office Timeline. This looks like the best option for print purposes.
I took LIS 598 Information Security this summer and we were given an eye-opening demonstration of just how easy it is for someone to crack passwords and invade systems wirelessly. That someone could be a computer in another country running an automatic script 24/7 or someone sitting in a vehicle on the street near your home. Here are five rules to follow for password protection:
Rule 1: Never share a password. Especially, NEVER EMAIL usernames and passwords.
Rule 2: Make passwords complex. Incorporate special characters, capital letters and numbers and make them at least 8 characters long.
Rule 3: Know that you are more vulnerable than you think. Most hackers will not “announce themselves” with a Rick Roll if they have penetrated your account.
Rule 4: Never leave your desktop computer, laptop or mobile device unattended and without some additional layer of security (password required to login).
Rule 5: Change passwords every few months and vary passwords for every account.
If you have trouble remembering passwords, password management software such as 1Password for Mac OS X or for Windows KeePass (free & open source) orLastPass can help. There are a lot of other password management tools out there too.
According to SplashData, these are the Top 25 Worst Passwords of 2011. If you use any of these passwords, I would suggest changing asap.
For example, the Adobe Design Premium package costs $399 with education pricing (Photoshop, Illustrator, InDesign, Acrobat X Pro, Dreamweaver, etc.). But the regular price of this package is US$1899.
To buy only Acrobat X Pro from the Microstore costs $75. Why would you buy this software? Acrobat Pro is Acrobat Reader but with a lot more functionality, such as writing sticky notes, replacing text, highlighting text, printing to PDF, inserting and deleting pages, fillable forms, OCR text recognition and security options.
But of course there are all sorts of free open source tools out there that may offer similar features if you are willing search them out!
The below resource summary may be of help to first year students.
A great open source cross-platform tool for recording audio using your computer is a program called Audacity (http://audacity.sourceforge.net/download/). You may need to use this program in 505 for example, when recording and/or editing sound files for interview participants.
If you don’t already know how to capture images from your screen try this:
Windows – Print Screen (PrtSc) – For the whole desktop to be captured. Then enter the application you want to deposit it in and paste (Ctrl-V).
Windows – Alt-PrtSc – The current open window. Then enter the application you want to deposit it in and paste (Ctrl-V).
Note cropping images in Windows requires a photo editor (Microsoft Paint, GIMP/GIMPshop, Paint.NET, Adobe Photoshop Express are all free).
Mac OS X – Shift-Command-4 – Hold your trackpad down and pull the cross hairs across the screen to “capture” the image (you are effectively using a crop and capture tool). It will automatically be saved to your desktop.
Mac OS X – Shift-Command-3 – An image of the whole screen will be saved to your desktop.
Want to jazz up your presentations (i.e. for that 503 bibliographic assignment I have been hearing about)? Try screen casting/screen recording tools. There are all kinds of open source software online (Adobe Captivate is very good but its professional quality software so you have to pay a lot!), so try these: